

Agents - Reusable AI Capabilities for Your Workspace
このコンテンツはまだ日本語訳がありません。
Agents run directly on your local machine, with full access to your files, terminal, and project directories. Unlike the built-in chat which sends messages to a remote model, an Agent delegates execution to an external CLI runtime that can read files, write code, run commands, and browse the web on your behalf.
Askimo itself doesn’t run the agent - it provides the unified UI to pick a workspace, launch a supported runtime as a subprocess, and stream its output back in real time. Your Skills library - reusable, file-based capability definitions - is managed by Askimo independently of any single runtime: instead of choosing a skill card and running it in isolation, you describe a goal in a chat-style interface, pick which agent runtime should carry it out, and that runtime’s own model autonomously reviews the skill catalog Askimo hands it and applies whichever skill (or combination of skills) best matches the task.
Supported runtimes today
Section titled “Supported runtimes today”| Runtime | Provider | Setup |
|---|---|---|
| Claude Code | Anthropic | Install the CLI, then run claude login to authenticate with your Anthropic account or Claude subscription |
| Antigravity CLI | Install the CLI, then add a Gemini API key in Askimo (free tier available with a Google account) | |
| Codex CLI | OpenAI | Install the CLI, then add an OpenAI API key in Askimo |
More agent runtimes will be supported in future releases.
This matters when the task is inherently local: reviewing a codebase, refactoring files, generating scaffolding, or analysing logs. These jobs require an agent that can navigate your directory tree and make changes in place. The Agents view brings that capability directly into Askimo’s interface without leaving your workspace.
Each Skill is a plain Markdown file that defines:
- A system prompt that tells the agent what role to play and how to behave.
- Optional supplemental files (additional context merged into the prompt).
- A frontmatter block with metadata such as name, description, and visibility.
Skills are stored as files on disk, so you can write them in any text editor, version-control them with Git, and share them with your team.
Agents vs Plans
Section titled “Agents vs Plans”Askimo has two ways to automate AI work. Choosing the right one depends on whether your task is about local files or structured reasoning.
| Agents | Plans | |
|---|---|---|
| What it does | Runs an agent on your local machine with file system access | Chains multiple AI prompts in a defined sequence |
| Requires install | Yes - Claude Code, Antigravity CLI, or Codex CLI | No - uses Askimo’s built-in AI |
| File access | Full read/write access to your workspace directory | None - text in, text out |
| Best for | Code review, refactoring, scaffolding, log analysis | Research reports, blog posts, job applications, meeting notes |
| Output | Changes made directly to your files + streamed output | A final text result shown in the app |
| Defined by | SKILL.md files with a system prompt, applied autonomously |
A YAML file with steps and inputs |
| Runs in | A local subprocess (the agent runtime) | Askimo’s built-in AI |
Use an Agent when the task requires reading or writing local files, running shell commands, or navigating a project directory.
Use a Plan when the task is a multi-step reasoning workflow that takes text inputs and produces a text result, with no need to touch the file system.
For example:
- “Review all TypeScript files in my project for type errors” - Agent (needs file access)
- “Write a blog post about remote work” - Plan (pure text reasoning)
- “Refactor my API routes to follow REST conventions” - Agent (reads and rewrites files)
- “Generate a competitor analysis report for my SaaS product” - Plan (structured multi-step reasoning)
Prerequisites
Section titled “Prerequisites”The Agents view requires at least one external agent runtime to be installed and reachable on your PATH. Askimo currently supports Claude Code, Antigravity CLI, and Codex CLI, with more runtimes planned.
Install:
npm install -g @anthropic-ai/claude-codeVerify:
claude --versionClaude Code requires an Anthropic API key or a Claude subscription. Follow the setup prompts the first time you run claude, or run claude login directly in a terminal.
Install:
Follow Google’s installation instructions to get the agy binary on your PATH.
Verify:
agy --versionAntigravity CLI authenticates with a Gemini API key - the same key used by Askimo’s Gemini chat provider. Add it once in the Agents view (or Settings) and both features share it; a free tier is available with a Google account.
Install:
npm install -g @openai/codexVerify:
codex --versionCodex CLI requires an OpenAI API key. Add it in Askimo when you select Codex as the agent runtime.
Once installed, Askimo detects the runtime automatically. You can see which runtimes are available directly in the Agents view’s agent picker, or in Settings → Agents & Skills.
Creating a Skill
Section titled “Creating a Skill”Before the agent can use a skill, you need one in your library. There are three ways to get started.
Option A - Create from the UI
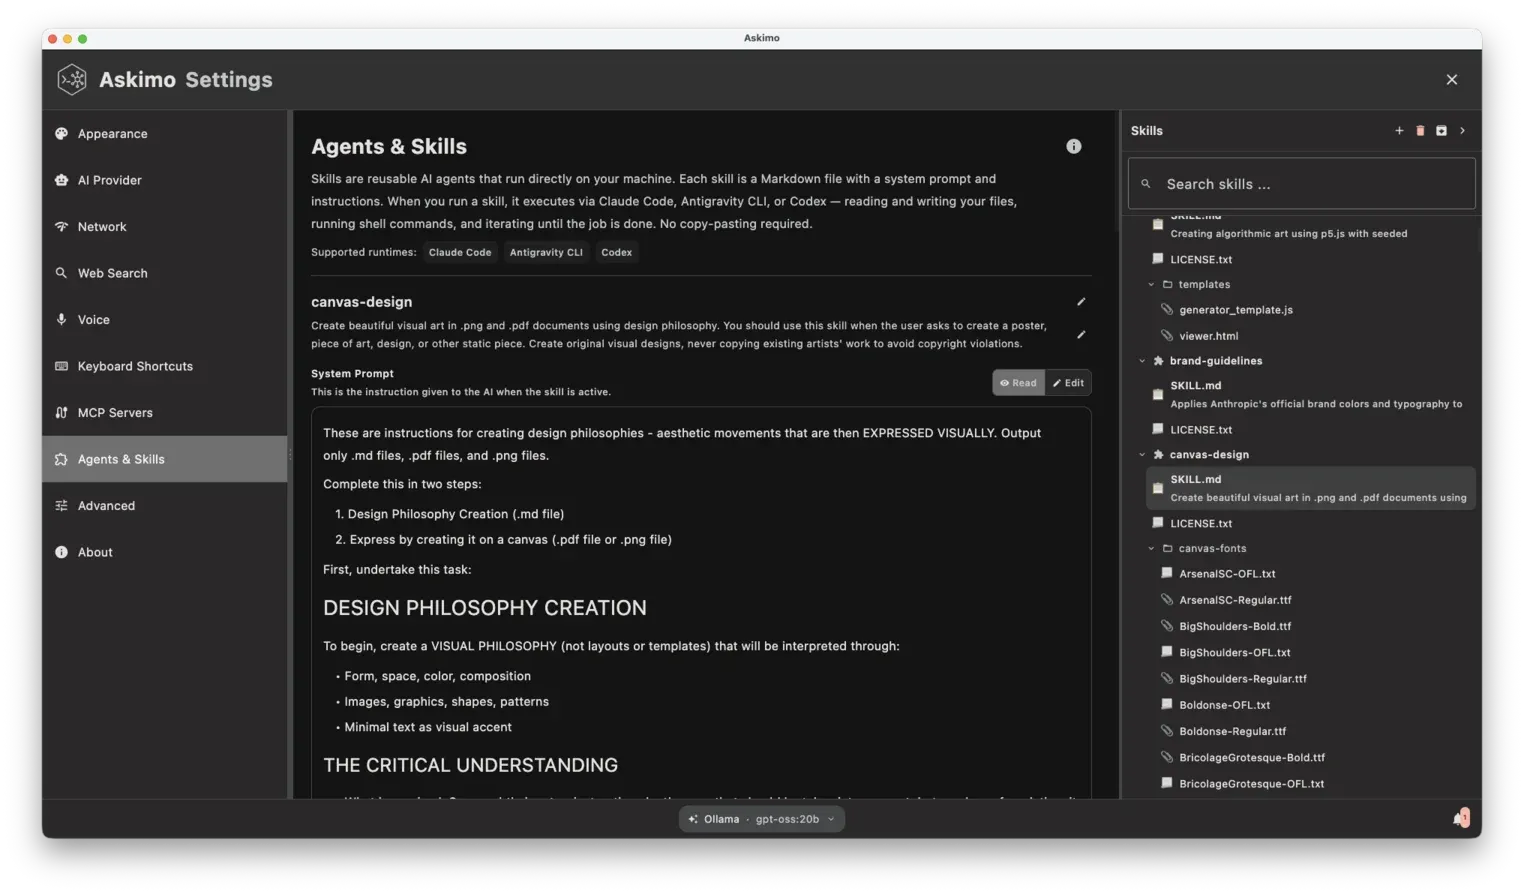
Section titled “Option A - Create from the UI”- Open Agents in the sidebar, then click Manage Skills (or go to Settings → Agents & Skills).
- Click the + button to create a new skill.
- Fill in the skill name and description.
- Write the system prompt in the editor.
- Click Save.
Askimo creates the folder and SKILL.md file automatically.
Option B - Import from GitHub
Section titled “Option B - Import from GitHub”The community shares skill packs as public GitHub repositories: ready-made agents for code review, writing, data analysis, and more. Importing one gives you a head start with battle-tested prompts instead of starting from scratch.
- Go to Settings → Agents & Skills.
- Click Import from GitHub.
- Paste the GitHub repository URL (e.g.
https://github.com/user/my-skills). - Click Import.
Askimo runs git clone and places the repository inside ~/.askimo/<profile>/skills/. Because it is a full git clone, you can pull updates as the community improves the skills:
cd ~/.askimo/personal/skills/my-skillsgit pullSupported URL formats:
https://github.com/user/repo- imports the entire repository as a skill pack.https://github.com/user/repo/tree/main/skills- imports from a subdirectory within the repo.
Option C - Import from a ZIP archive
Section titled “Option C - Import from a ZIP archive”If a skill pack isn’t published on GitHub (or you just want to import a local copy), you can import it from a .zip file instead.
- Go to Settings → Agents & Skills.
- Click Import from ZIP.
- Choose a ZIP file whose skill folders each contain a
SKILL.md(orskill.md) entry file. - Click Import ZIP.
Skill File Anatomy
Section titled “Skill File Anatomy”A skill lives in its own folder inside ~/.askimo/<profile>/skills/. The folder must contain a file named SKILL.md (skill.md and Skill.md are also accepted).
~/.askimo/personal/skills/├── coding/ ← category folder (no SKILL.md)│ └── code-reviewer/ ← skill folder│ ├── SKILL.md ← required entry point│ ├── examples.md ← supplemental context (merged into prompt)│ └── SampleOutput.java ← supplemental file (copied, not merged)└── writing/ └── blog-writer/ └── SKILL.mdRules:
- A skill is any folder that contains
SKILL.md. - Plain folders without
SKILL.mdare transparent category containers used for organisation. - All
.mdfiles inside a skill folder (except reserved names) are merged into the system prompt as additional context. - Sub-folders of a skill folder are not treated as separate skills.
- Reserved filenames (
CLAUDE.md,GEMINI.md,AGENTS.md,README.md) are never merged.
The SKILL.md File
Section titled “The SKILL.md File”A SKILL.md file has two parts separated by a --- frontmatter block:
---name: Code Reviewerdescription: Reviews code for bugs, style, and best practicesvisibility: private---
You are an expert code reviewer. When given a file path or code snippet, you:
1. Identify bugs and potential issues2. Suggest improvements for readability and performance3. Check for security vulnerabilities4. Provide actionable, specific feedback with code examples
Always explain *why* something is a problem, not just *that* it is.
Frontmatter Fields
Section titled “Frontmatter Fields”| Field | Required | Description |
|---|---|---|
name |
- | Display name shown in the gallery. Defaults to the folder name (kebab-case to Title Case). |
description |
- | Short description shown on the skill card, and surfaced to the agent so it can decide when this skill is relevant. |
visibility |
- | private (default) or public. Private skills never sync to other devices. |
The body (everything after the closing ---) is used verbatim as the system prompt sent to the agent.
Supplemental Files
Section titled “Supplemental Files”Any additional .md file inside the skill folder is automatically merged into the system prompt after SKILL.md. This is useful for:
- Examples:
examples.mdwith annotated sample inputs and outputs. - Reference material:
api-reference.mdwith domain knowledge. - Rules:
style-guide.mdwith project conventions.
Files are merged in sorted order (alphabetical). The combined prompt includes a directory listing so the agent knows what files are available.
Using the Agents View
Section titled “Using the Agents View”Finding the Agents View
Section titled “Finding the Agents View”Agents live in the Agents section of the main navigation sidebar.
Picking a Workspace and an Agent Runtime
Section titled “Picking a Workspace and an Agent Runtime”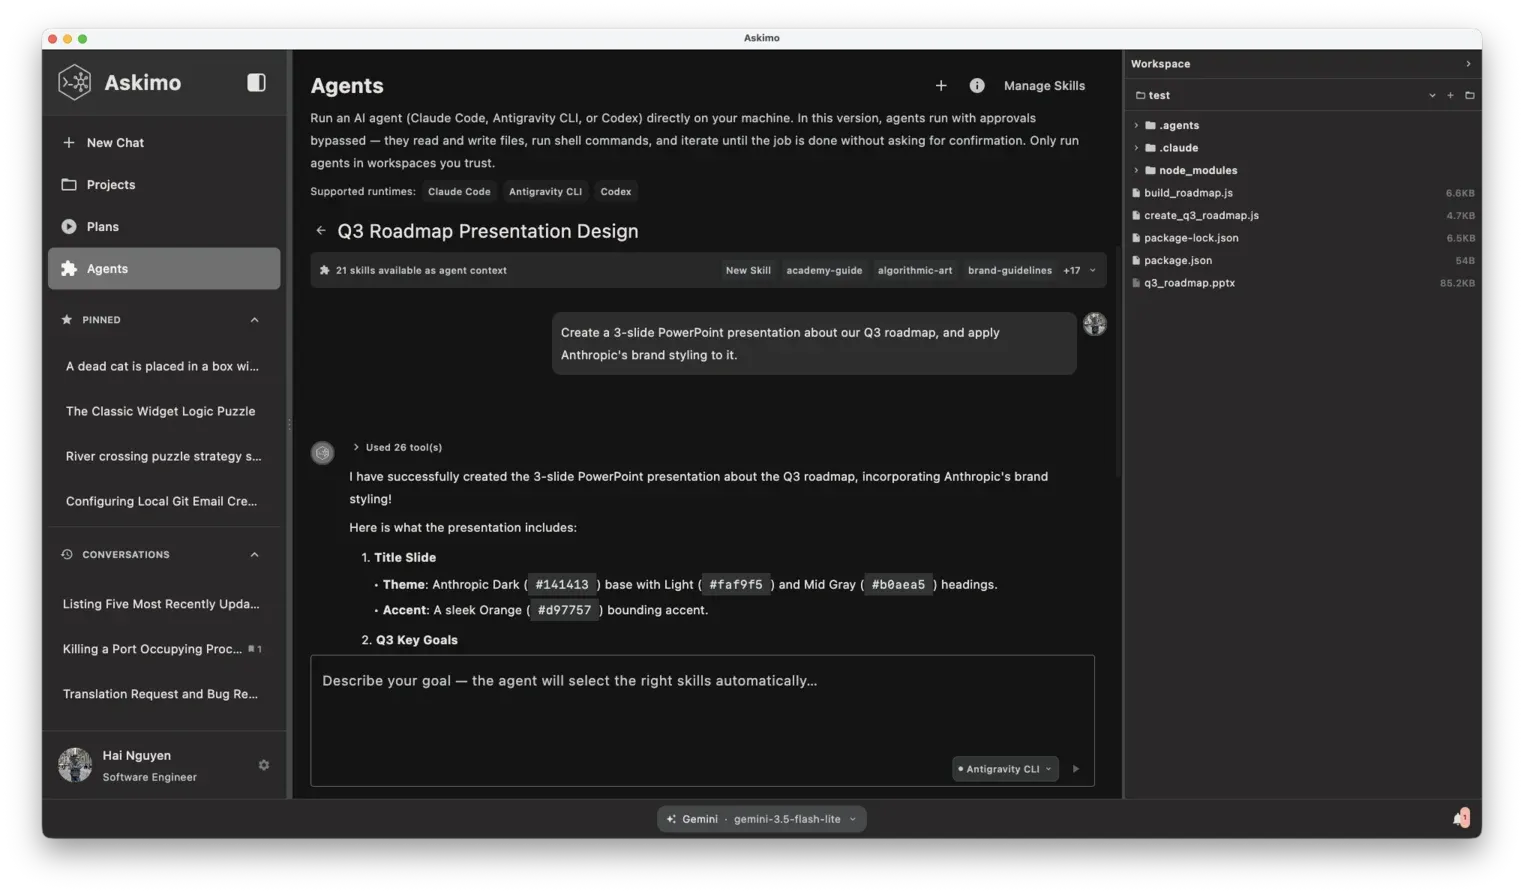
The Agents view is a chat-style interface, similar to regular chat, but backed by a real CLI subprocess with file system access instead of a hosted model:
- Open the Agents view from the sidebar.
- A workspace - the directory the agent operates in - is remembered from your last session. Change it any time from the side panel’s folder picker; each workspace keeps its own run history.
- Type your goal in the chat input at the bottom (e.g. “Review the auth module for security issues”).
- Pick the agent runtime (Claude Code, Antigravity CLI, or Codex CLI) from the picker pill next to the input. A coloured dot shows readiness: ready, needs setup, or not installed.
- Click Run (or press Enter).
The agent starts immediately. You can watch its output stream in real time - response text, tool calls (file reads, writes, shell commands), and thinking (when the model exposes it) all appear inline, exactly as the agent’s own stream reports them.
The agent runtime is locked once a conversation has a turn in it, so it can’t be switched mid-session - click New Chat to start a fresh conversation with a different agent. While a turn is running, the Run button becomes Stop, letting you interrupt a long-running or stuck agent process at any time.
How the Agent Chooses a Skill
Section titled “How the Agent Chooses a Skill”You don’t select a specific skill before running - instead, a pill above the chat input shows “N skills available as agent context”. Click it to preview your skill library, or jump straight to Manage Skills (Settings → Agents & Skills). The agent reviews your goal against the full catalog and autonomously picks whichever skill (or combination of skills) is the best fit; you never need to remember which skill applies to a task.
If you haven’t created any skills yet, the agent simply relies on its own built-in capabilities - Skills are an optional way to extend it, not a requirement to get started.
Run History
Section titled “Run History”Every conversation is saved automatically, scoped to its workspace. The History view (shown before you send your first message, or after using Back to history) lists past runs; click any entry to reopen and continue that conversation. Delete individual records using the delete icon that appears on hover.
How Agents Work Under the Hood
Section titled “How Agents Work Under the Hood”When you send a goal in the Agents view, Askimo:
- Loads your full Skills library - every
SKILL.mdfile (and supplemental.mdfiles) under~/.askimo/<profile>/skills/. - Builds a system prompt tailored to the selected runtime’s own discovery capabilities. For agents with native skill discovery (Claude Code, Antigravity CLI), the prompt collapses to a single instruction to use any available skill - the skill definitions themselves are surfaced separately, in the next step, so nothing is duplicated. For agents without reliable native discovery in arbitrary directories (Codex CLI), the full skill catalog - names, descriptions, and content - is inlined directly into the prompt instead, since it has no other way to see it.
- Materializes each skill into that runtime’s own skill folder (e.g.
.claude/skills/,.agents/skills/) - copied for Claude Code and Codex CLI, or symlinked for Antigravity CLI - so a runtime with native discovery can find it directly, alongside any skills already installed there. This step runs for every runtime (even Codex, as a best-effort extra), independently of whether that runtime’s discovery is actually relied upon in step 2. - Launches the selected agent runtime (Claude Code, Antigravity CLI, or Codex CLI) as a subprocess in your current workspace directory, with interactive approval prompts bypassed.
- Streams the agent’s output - tokens, tool calls, thinking, and status - back into the Agents view in real time.
- Saves the turn to that workspace’s run history, and captures the runtime’s native session/thread id so a follow-up message continues the same underlying conversation instead of Askimo replaying prior turns itself.
flowchart LR U([You describe a goal]) --> A[Askimo] A -->|system prompt + goal| R[Agent runtime\nClaude Code / Antigravity CLI / Codex CLI] R -->|reads & writes| F[Your workspace files] R -->|streams output| A A --> H[Turn saved to workspace history]Writing Effective Skills
Section titled “Writing Effective Skills”Give the Agent a Clear Role
Section titled “Give the Agent a Clear Role”Start your system prompt with a role definition. This anchors the agent’s behaviour for the entire session:
You are a senior TypeScript engineer specialising in React and Next.js.Your job is to review code for correctness, performance, and maintainability.Be Explicit About Output Format
Section titled “Be Explicit About Output Format”Agents tend to produce better results when you tell them exactly what format you want:
For each issue found, output:- **File**: path/to/file.ts (line N)- **Severity**: Critical / Warning / Suggestion- **Issue**: one-sentence description- **Fix**: the corrected code snippetWrite a Strong Description
Section titled “Write a Strong Description”Since the agent autonomously decides which skill(s) apply to a given goal, the frontmatter description doubles as the signal it uses to match your goal to the right skill. A vague description ("Helps with code") makes a skill easy to miss; a specific one ("Reviews TypeScript/React code for bugs, type errors, and performance issues") makes it easy for the agent to pick correctly - and easy for you to recognise in the skills-available pill.
Use Supplemental Files for Context
Section titled “Use Supplemental Files for Context”Heavy reference material (API docs, style guides, example outputs) belongs in supplemental .md files rather than in SKILL.md. This keeps the entry point readable and lets you update reference material independently.
my-skill/├── SKILL.md ← role + behaviour instructions├── style-guide.md ← coding standards reference└── examples.md ← annotated good/bad examplesSet the Right Workspace
Section titled “Set the Right Workspace”The agent operates relative to the workspace directory selected in the side panel. For code tasks, point it at the project root so the agent can navigate the full directory tree. For document tasks, point it at the folder containing the files you want to work with.
Keep Skills Focused
Section titled “Keep Skills Focused”A skill that does one thing well outperforms one that tries to handle everything. If you find yourself writing “and also…” in the system prompt, consider splitting into two skills.
Managing Skills
Section titled “Managing Skills”Editing a Skill
Section titled “Editing a Skill”Open Settings → Agents & Skills, select the skill, and click Edit - or edit SKILL.md directly in any text editor. Changes are picked up immediately - no restart needed.
Deleting a Skill
Section titled “Deleting a Skill”- In Settings → Agents & Skills, right-click the skill (or use its menu).
- Select Delete.
- Confirm the deletion.
This deletes the entire skill folder from disk.
Where Skills Are Stored
Section titled “Where Skills Are Stored”~/.askimo/<profile>/skills/Skills are plain files - back them up, version-control them, or share them by copying the folder.
Tips and Best Practices
Section titled “Tips and Best Practices”Point your workspace at the project root. The agent uses the workspace directory as its anchor for file navigation. A wrong workspace is the most common source of “file not found” errors.
Permission prompts are suppressed automatically. Askimo passes each runtime’s own auto-approve flag - --dangerously-skip-permissions for Claude Code and Antigravity CLI, --dangerously-bypass-approvals-and-sandbox for Codex CLI - so the agent never blocks waiting for interactive approval during a run. This also means you should only run agents in workspaces you trust.
Keep the system prompt under ~4,000 words. Very long prompts can dilute the agent’s focus. If you need extensive reference material, split it across supplemental files - the agent receives a directory listing and can request specific files as needed.
Write a specific description. Since the agent picks skills autonomously based on your goal, a precise description is what makes a skill get selected (and skipped) correctly - see Write a Strong Description.
Version-control your skills with Git. Since skills are plain files, a git init inside ~/.askimo/<profile>/skills/ (or a subfolder) gives you full history and makes it easy to roll back changes.
Troubleshooting
Section titled “Troubleshooting”“No agent installed”
Section titled ““No agent installed””None of Claude Code, Antigravity CLI, or Codex CLI is installed or on PATH. Install at least one runtime:
npm install -g @anthropic-ai/claude-code # Claude Codenpm install -g @openai/codex # Codex CLIFor Antigravity CLI, follow Google’s installation instructions to get agy on your PATH (see Prerequisites).
Restart Askimo after installation.
The agent picker shows “needs setup”
Section titled “The agent picker shows “needs setup””The binary is installed but not yet authenticated/configured:
- Claude Code - run
claude loginin a terminal, or checkclaude doctor. - Antigravity CLI - add a Gemini API key when prompted in the Agents view (or in Settings).
- Codex CLI - add an OpenAI API key when prompted in the Agents view (or in Settings).
The agent hangs or produces no output
Section titled “The agent hangs or produces no output”- Check that the workspace directory exists and is accessible.
- Confirm the selected agent’s readiness dot shows ready (not “needs setup”) in the agent picker.
- Try the same goal against a different agent runtime to isolate whether the issue is CLI-specific.
“SKILL.md not found” or skill does not appear in the library
Section titled ““SKILL.md not found” or skill does not appear in the library”Verify that the skill folder contains a file named SKILL.md (or skill.md / Skill.md - all are accepted). A file placed at the wrong depth will not be detected.
Agent edits the wrong files
Section titled “Agent edits the wrong files”The agent operates in the workspace directory selected in the side panel. Double-check that the correct project folder is selected before sending a goal.
Supplemental file not included in prompt
Section titled “Supplemental file not included in prompt”Ensure the supplemental file:
- Is inside the skill folder (not a sub-folder of the skill folder).
- Is not named
CLAUDE.md,GEMINI.md,AGENTS.md, orREADME.md- these are reserved and ignored.
Learn More
Section titled “Learn More”- MCP Integration - extend your agent with external tools via the Model Context Protocol
- Plans - multi-step AI workflows for tasks that don’t require local file access
- Settings - configure agent runtimes and skill storage paths