

 Hai Nguyen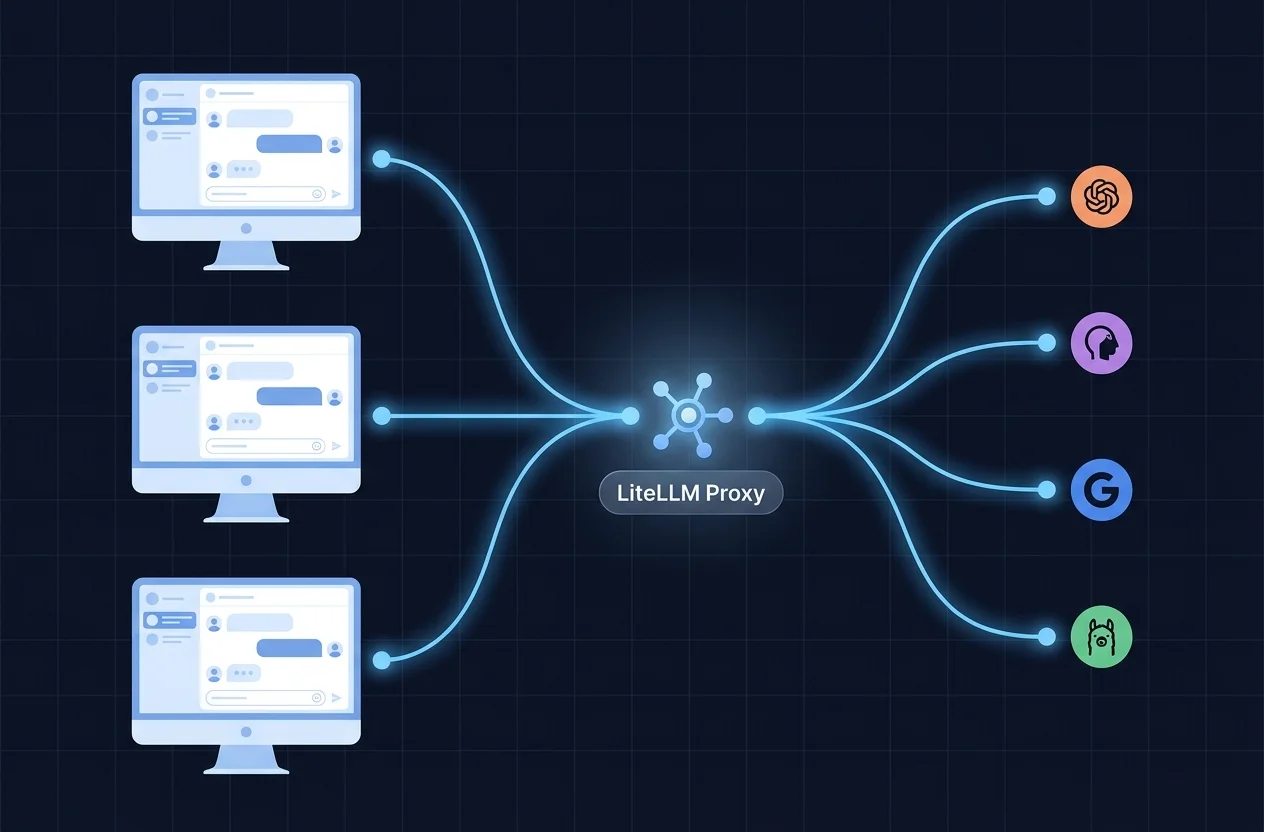
The Problem: Every User Needs Their Own API Key
Askimo is a free, open-source desktop AI client. By default it’s a bring-your-own-key app — you supply your own OpenAI, Anthropic, or Gemini API keys, and they’re stored encrypted on your own machine. That’s great for individual users who want full privacy and cost control.
But for a community group, a small team, or a shared workspace, this model creates friction:
- Every user needs to sign up for their own provider accounts
- Spending is fragmented across many keys, making it impossible to manage centrally
- New members can’t use the tool until they’ve gone through the API key setup
- Teams that already pay for one shared OpenAI/Anthropic account have to duplicate costs
This is exactly the gap that OpenWebUI tries to fill — it adds a web UI in front of a shared backend. But OpenWebUI is browser-based and server-hosted. Askimo stays local and private on each user’s machine.
The answer is to put a shared proxy in front of the AI providers. Users connect Askimo to the proxy, not to the provider directly. The proxy holds the real API keys. Users never see them.
The Architecture
flowchart LR    A1["Askimo Desktop<br/>User 1"] --> P    A2["Askimo Desktop<br/>User 2"] --> P    A3["Askimo Desktop<br/>User 3"] --> P
    subgraph P["LiteLLM Proxy (self-hosted)"]        direction TB        VK["Virtual Keys<br/>per user"]        RT[Model Router]        VK --> RT    end
    P --> OAI["OpenAI<br/>GPT models"]    P --> ANT["Anthropic<br/>Claude models"]    P --> GEM["Google<br/>Gemini models"]    P --> OLL["Ollama<br/>Local models"]
LiteLLM is an open-source AI gateway that sits in front of your providers and exposes a single OpenAI-compatible /v1 endpoint. It routes requests to any backend — OpenAI, Anthropic, Gemini, Ollama, and more — and handles virtual keys, budget limits, and usage tracking in one place.
Because LiteLLM speaks the OpenAI API format, Askimo’s OpenAI-Compatible provider connects to it out of the box — no custom code, no special plugin.
Coming soon: Askimo Team will bring native shared workspaces, conversation history, and team management directly into Askimo — no proxy required. LiteLLM is the best bridge for groups who want a shared setup today.
Prerequisites
- A machine (or VM/server) that all team members can reach on the network — can be a local server, a NAS, a VPS, or even a developer’s laptop on a shared network
- Docker (recommended) or Python 3.9+
- API keys for the AI providers your team uses
Step 1: Install and Start LiteLLM
Option A: Docker Compose (Recommended)
LiteLLM’s official Docker Compose setup includes a PostgreSQL database, which enables full Admin UI model management — add, edit, and remove models without ever touching a config file.
Create a .env file with your provider API keys:
LITELLM_MASTER_KEY=sk-your-master-key-hereOPENAI_API_KEY=sk-your-openai-keyANTHROPIC_API_KEY=sk-ant-your-anthropic-keyGEMINI_API_KEY=your-gemini-keyThen start the full stack with a single command:
curl -sSL https://docs.litellm.ai/docker-compose.yml | docker compose --env-file .env.production -f - up -dOnce running, open the Admin UI at http://localhost:4000/ui and log in with your master key. From there you can:
- Add models — OpenAI, Anthropic, Gemini, Ollama, or any OpenAI-compatible endpoint
- Create virtual keys per user with spend limits and model access controls
- Monitor usage and costs across all team members
Adding Ollama via the Admin UI on macOS/Windows
When adding an Ollama model in the UI, use http://host.docker.internal:11434 as the API Base — not localhost. Docker containers can’t reach the host machine via localhost. On Linux, add --add-host=host.docker.internal:host-gateway to the LiteLLM service in the compose file.
Option B: Plain Docker (config file only)
If you prefer a simpler single-container setup without a database, create a litellm-config.yaml first:
model_list:  - model_name: gpt-latest        # replace with your preferred OpenAI model    litellm_params:      model: openai/gpt-4o        # update to the latest model name      api_key: os.environ/OPENAI_API_KEY
  - model_name: claude-latest     # replace with your preferred Anthropic model    litellm_params:      model: anthropic/claude-sonnet-4-5  # update to the latest model name      api_key: os.environ/ANTHROPIC_API_KEY
  - model_name: gemini-latest     # replace with your preferred Gemini model    litellm_params:      model: gemini/gemini-2.0-flash      # update to the latest model name      api_key: os.environ/GEMINI_API_KEY
litellm_settings:  drop_params: true
general_settings:  master_key: sk-your-master-key-here
Use the Admin UI instead
With Option A (Docker Compose), you add models through the Admin UI and can always pick the latest model names from the provider’s current model list — no YAML editing required.
Then run:
docker run -d \ --name litellm-proxy \ -p 4000:4000 \ -v $(pwd)/litellm-config.yaml:/app/config.yaml \ -e OPENAI_API_KEY=sk-your-openai-key \ -e ANTHROPIC_API_KEY=sk-ant-your-anthropic-key \ -e GEMINI_API_KEY=your-gemini-key \ ghcr.io/berriai/litellm:main-latest \ --config /app/config.yaml --port 4000Note: without a database, model changes require editing the YAML file and restarting the container.
Option C: Python
pip install litellm[proxy]
export OPENAI_API_KEY=sk-your-openai-keyexport ANTHROPIC_API_KEY=sk-ant-your-anthropic-key
litellm --config litellm-config.yaml --port 4000
Verify It’s Running
curl http://localhost:4000/v1/models \ -H "Authorization: Bearer sk-your-master-key-here"You should see a JSON list of your configured models. If you’re on a server, replace localhost with the server IP — e.g. http://192.168.1.100:4000/v1.
Step 2: Create Per-User Virtual Keys (Optional but Recommended)
Instead of giving everyone the master key, generate a virtual key per user. This lets you set spending limits and revoke access individually without changing the real provider API keys.
Open the LiteLLM admin UI at http://your-server:4000/ui (log in with the master key), or use the API:
# Create a virtual key for a team membercurl -X POST http://localhost:4000/key/generate \ -H "Authorization: Bearer sk-your-master-key-here" \ -H "Content-Type: application/json" \ -d '{ "key_alias": "alice", "max_budget": 10, "budget_duration": "monthly", "models": ["gpt-latest", "claude-latest", "gemini-latest"] }'The response contains a key field — something like sk-team-xxxxxxxx. Give that key to the team member. They enter it in Askimo as their API key for the proxy.
If you don’t want any key requirement at all (e.g. internal network, fully trusted environment), you can skip key generation entirely and leave the API key field blank in Askimo.
Step 3: Connect Askimo to the LiteLLM Proxy
On each user’s machine:
-
Open Askimo — click the provider pill in the footer bar (bottom centre of the main screen) to open the provider picker, then click Add Provider. Alternatively, go to Settings → AI Providers.
-
Select Other providers from the provider list
-
Fill in the settings:
Field Value Provider Name Any label you like (e.g. Team AI)Base URL http://your-server-ip:4000/v1API Key The virtual key you generated (or leave blank if not required) API Mode Chat Completions (default) HTTP Version HTTP/1.1 (default)
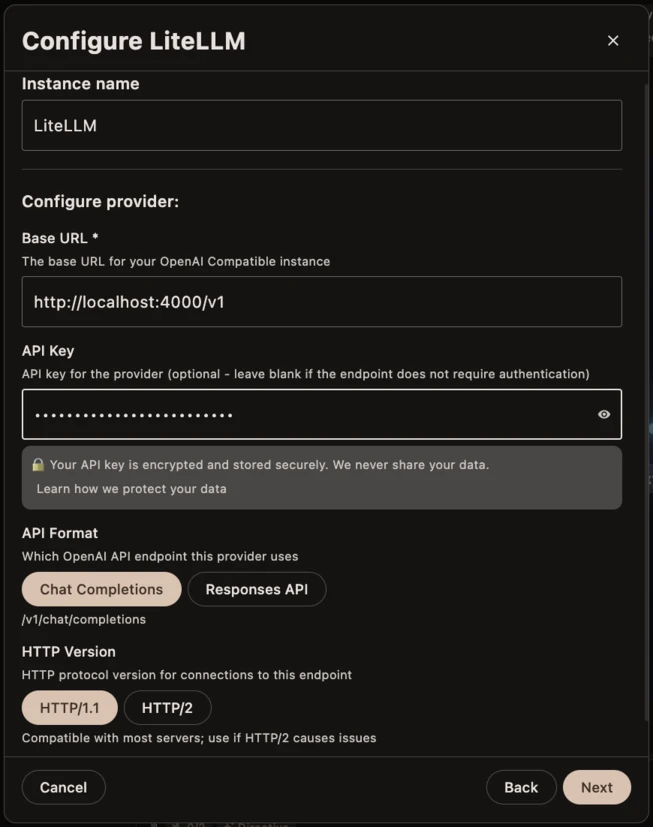
- Save — Askimo will call
/v1/modelsand automatically populate the model list with every model you have configured in LiteLLM
Users can now pick any model the admin has enabled — without ever seeing the real API keys.
Share the URL, not the keys
The only thing users need is the proxy URL and (optionally) their personal virtual key. The real OpenAI/Anthropic/Gemini keys stay on the server, managed by whoever runs LiteLLM.
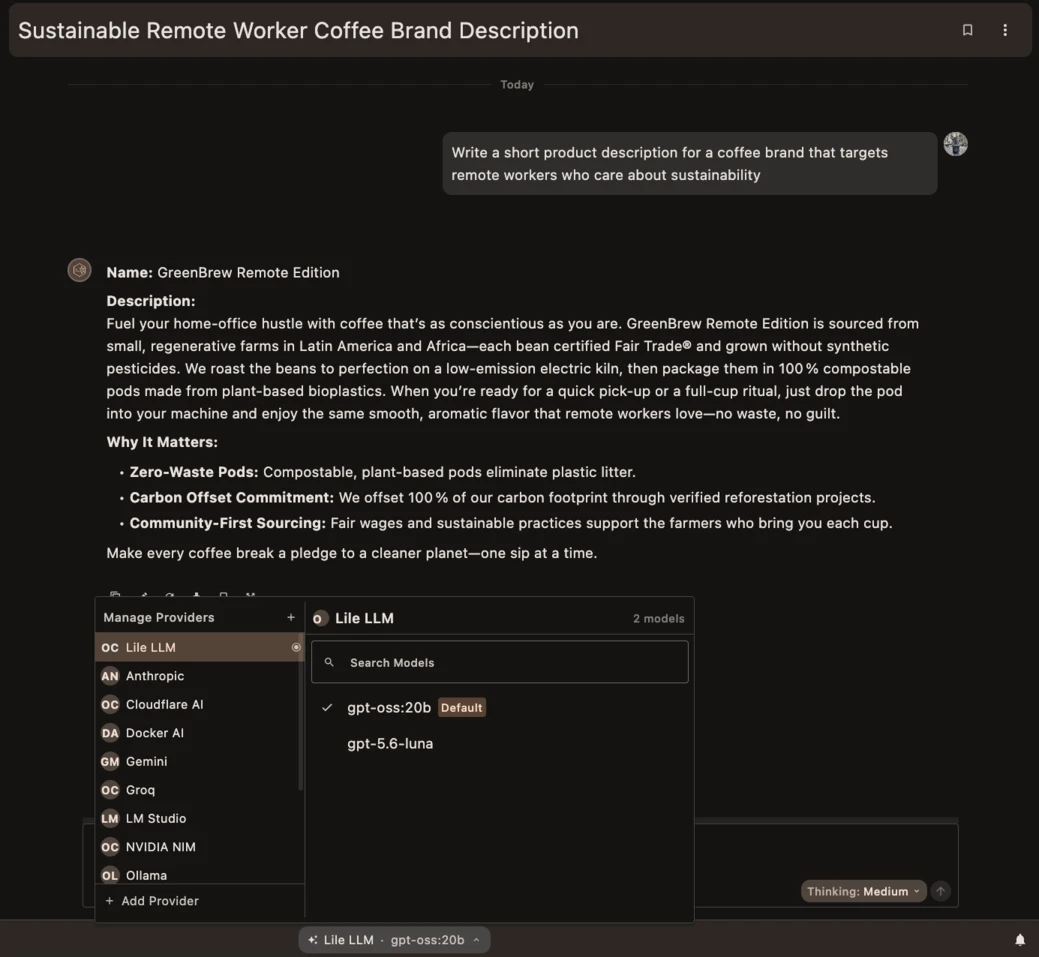
- Start chatting! Askimo sends requests to LiteLLM, which routes them to the correct provider and returns the response.
What Your Team Gets with a Shared AI Proxy
Once LiteLLM is running and Askimo is pointed at it, the experience for each team member is identical to using Askimo directly — except:
- No personal API key setup — one URL is all they configure
- Access to all models the admin has enabled — switch between the latest GPT, Claude, Gemini, or a local Llama model from the Askimo model picker
- Shared cost — one OpenAI/Anthropic account, one bill, one admin
- Individual spend limits — each virtual key can have its own monthly budget (e.g. $20/user/month)
- Revocable access — remove a user by deleting their virtual key, no need to rotate the real API key
- All Askimo features work — RAG, Plans, MCP, directives, conversation history — everything runs locally per user as normal
Adding Free Local AI Models with Ollama (Optional)
If the team also wants access to open-source models without GPU requirements on each machine, run Ollama on the server and add it to LiteLLM’s config:
  - model_name: llama3.3    litellm_params:      model: ollama/llama3.3      api_base: http://localhost:11434
  - model_name: mistral    litellm_params:      model: ollama/mistral      api_base: http://localhost:11434
Now llama3.3 and mistral appear in Askimo’s model list alongside the cloud models — and they’re free to use, running on your server.
Askimo + LiteLLM vs OpenWebUI
Both solve the “shared AI for a team” problem, but they take opposite approaches:
| Askimo + LiteLLM | OpenWebUI | |
|---|---|---|
| Client | Native desktop app (macOS, Windows, Linux) | Web browser |
| Conversation storage | Local on each user’s machine | Server database |
| Privacy | Chats never leave the user’s computer | Chats stored centrally |
| Offline chat history | ✅ Yes | ❌ Requires server |
| RAG | Local per-user project indexing | Server-side |
| Plans / multi-step workflows | ✅ Built-in | ❌ Requires pipelines + scripting |
| MCP client | ✅ Built-in | ❌ No native MCP |
| Shared chat history | ❌ Not shared (local per user) | ✅ Yes |
| User management | Via LiteLLM admin UI | Via OpenWebUI admin |
| Setup complexity | LiteLLM only (lightweight) | Docker stack required |
The key difference: OpenWebUI centralises everything on a server. Askimo keeps the AI experience local — conversations, RAG indexes, and settings all stay on each user’s machine. LiteLLM provides only the shared credential layer.
This makes Askimo + LiteLLM a better fit for teams where privacy and individual ownership of data matter, while OpenWebUI suits teams that need shared conversation history and centralised admin.
Shared team history and admin features will be covered by Askimo Team — the server-side complement to the desktop app. For now, LiteLLM gives community groups and small teams the shared-account experience today without waiting for a team server.
Sharing LiteLLM with a Remote or Distributed Team
If your team is distributed, you’ll want LiteLLM accessible over the internet. A simple option:
Caddy reverse proxy with HTTPS
your-proxy.example.com { reverse_proxy localhost:4000}Run Caddy alongside LiteLLM and it handles TLS automatically via Let’s Encrypt. Users then set:
- Base URL:
https://your-proxy.example.com/v1
All traffic is encrypted. Virtual keys provide authentication.
For a quick test without a domain, tools like Tailscale or Cloudflare Tunnel let you expose a local server securely with no port forwarding.
Troubleshooting Common LiteLLM + Askimo Issues
No models showing in Askimo after connecting?
- Check that the Base URL ends with
/v1(e.g.http://192.168.1.100:4000/v1) - Confirm LiteLLM is running:
curl http://your-server:4000/health - Make sure the virtual key has access to at least one model
“Invalid API key” error?
- Verify the key was created correctly in LiteLLM’s admin UI
- Check there are no extra spaces when pasting the key into Askimo
- If you’re not using keys, leave the field blank in Askimo
Model appears but returns errors?
- The real provider API key (OpenAI/Anthropic) may be invalid or out of credits
- Check LiteLLM logs:
docker logs litellm-proxy - Test the model directly:
curl http://localhost:4000/v1/chat/completions -H "Authorization: Bearer sk-your-key" -d '{"model":"gpt-4o-mini","messages":[{"role":"user","content":"hi"}]}'
Users can’t reach the proxy?
- Check firewall rules allow port 4000 (or 443 if using a reverse proxy)
- On macOS/Linux:
sudo ufw allow 4000or equivalent
Summary: Shared AI for Your Team in 15 Minutes
| Step | What you do |
|---|---|
| 1 | Run LiteLLM with your team’s provider API keys |
| 2 | Generate a virtual key per user (or skip for open internal access) |
| 3 | Each user adds an OpenAI-Compatible provider in Askimo pointing at the proxy URL |
| 4 | Done — users pick from all configured models with no personal keys |
The total setup time is under 15 minutes. Once running, adding a new team member is one step: generate a virtual key and share the proxy URL.
Get Started
- Download Askimo Desktop — free, open source, Windows / Mac / Linux
- LiteLLM documentation — full proxy and virtual key reference
- OpenAI-Compatible Provider guide in Askimo — detailed configuration reference
If you set this up for your team and have feedback, open an issue or start a discussion on the Askimo GitHub repository. ⭐
Frequently Asked Questions
How do I share an OpenAI API key with my team without exposing it? Run a LiteLLM proxy on a shared server and add your OpenAI API key there. Each team member gets a virtual key that authenticates against the proxy — they never see the real API key. Revoke or limit any virtual key at any time from the LiteLLM admin UI.
Can multiple users share one ChatGPT or Claude account using LiteLLM? Yes. LiteLLM sits in front of your provider accounts and routes requests from all team members through a single set of API keys. Each user gets their own virtual key with optional spend limits. All usage is tracked centrally.
Do users need their own AI provider accounts? No. Only the person who sets up and runs the LiteLLM proxy needs provider accounts. Everyone else just needs the proxy URL (and optionally a personal virtual key).
How do I set up LiteLLM for a team?
Create a .env file with your provider API keys, run curl -sSL https://docs.litellm.ai/docker-compose.yml | docker compose --env-file .env -f - up -d, then open http://localhost:4000/ui to add models and create per-user virtual keys. Full steps are in this guide above.
Can I limit which AI models each team member can access?
Yes. When generating a virtual key, set the models array to restrict which models that key can call. A free-tier user could be limited to a cheaper model while admins get access to all.
Can I set spending limits per user with LiteLLM?
Yes. Use max_budget and budget_duration when generating virtual keys. LiteLLM tracks spend per key and rejects requests once the budget is exhausted.
Does LiteLLM work with local models like Ollama?
Yes. Add Ollama as a backend in LiteLLM’s config using http://host.docker.internal:11434 as the API base (when running LiteLLM in Docker). Local Ollama models appear in Askimo’s model picker alongside cloud models.
Is my conversation data stored by LiteLLM? Your messages pass through the proxy on the way to the provider. LiteLLM can optionally log requests (disabled by default). Conversation history itself is stored locally in Askimo on each user’s machine — not on the LiteLLM server.
What happens if the LiteLLM proxy goes down? Users lose access to cloud models until the proxy is back up. Local models via Ollama installed directly on a user’s machine still work as a separate provider in Askimo.
Can I use LiteLLM with Askimo’s RAG feature? Yes. RAG runs entirely locally in Askimo — it indexes files on the user’s machine and injects context into the prompt before sending it to the model. The proxy doesn’t affect RAG at all.